Complete solution for remote ham radio control. Connect from Windows, web browsers, mobile devices, or Home Assistant. Stream audio, control frequencies, and decode CW/RTTY digital modes.
Download Latest Version📻 Why OmniRig Remote?
Everything you need to control your ham radio remotely over your local network or beyond.
🎧 Real-Time Audio Streaming
Listen to your radio through any client with low-latency 12kHz 16-bit PCM audio. Works on desktop, web browsers, and mobile devices.
🔢 Server-Side Digital Decoders
Advanced CW and RTTY decoders run on the server for maximum accuracy. No audio jitter – decode Morse up to 40+ WPM and RTTY at 45.45/50 baud reliably.
💻 Multi-Platform Clients
Windows desktop client, web browser interface, iOS/Android mobile apps, and Home Assistant integration. Use any device – they all stay in sync.
🔌 Multi-Rig Support
Control up to 4 radios simultaneously through OmniRig. Switch between rigs instantly with custom naming. Each maintains its own state.
🚀 System Architecture
A unified server architecture with multiple client connection options.

Network Ports
📦 Components
The OmniRig Remote ecosystem includes multiple client applications for different platforms.
Server (Windows)
Main server connects to your radio via OmniRig. Manages all clients, audio streaming, and CW/RTTY decoding.
Desktop Client
Native Windows app with VFO knob control, frequency display, and audio playback via TCP.
Web Client
Browser-based interface. Frequency tuning, memory channels, audio streaming, and CW/RTTY decoders.
Home Assistant
Custom Lovelace card for smart home integration. Control your radio from your dashboard.
Cross-Platform App
.NET MAUI app for Windows, iOS, and Android. Touch-friendly controls and band selection.
Arduino Integration
USB serial protocol for hardware projects. Build controllers with physical knobs and buttons.
📷 Screenshots
See OmniRig Remote in action across different platforms.
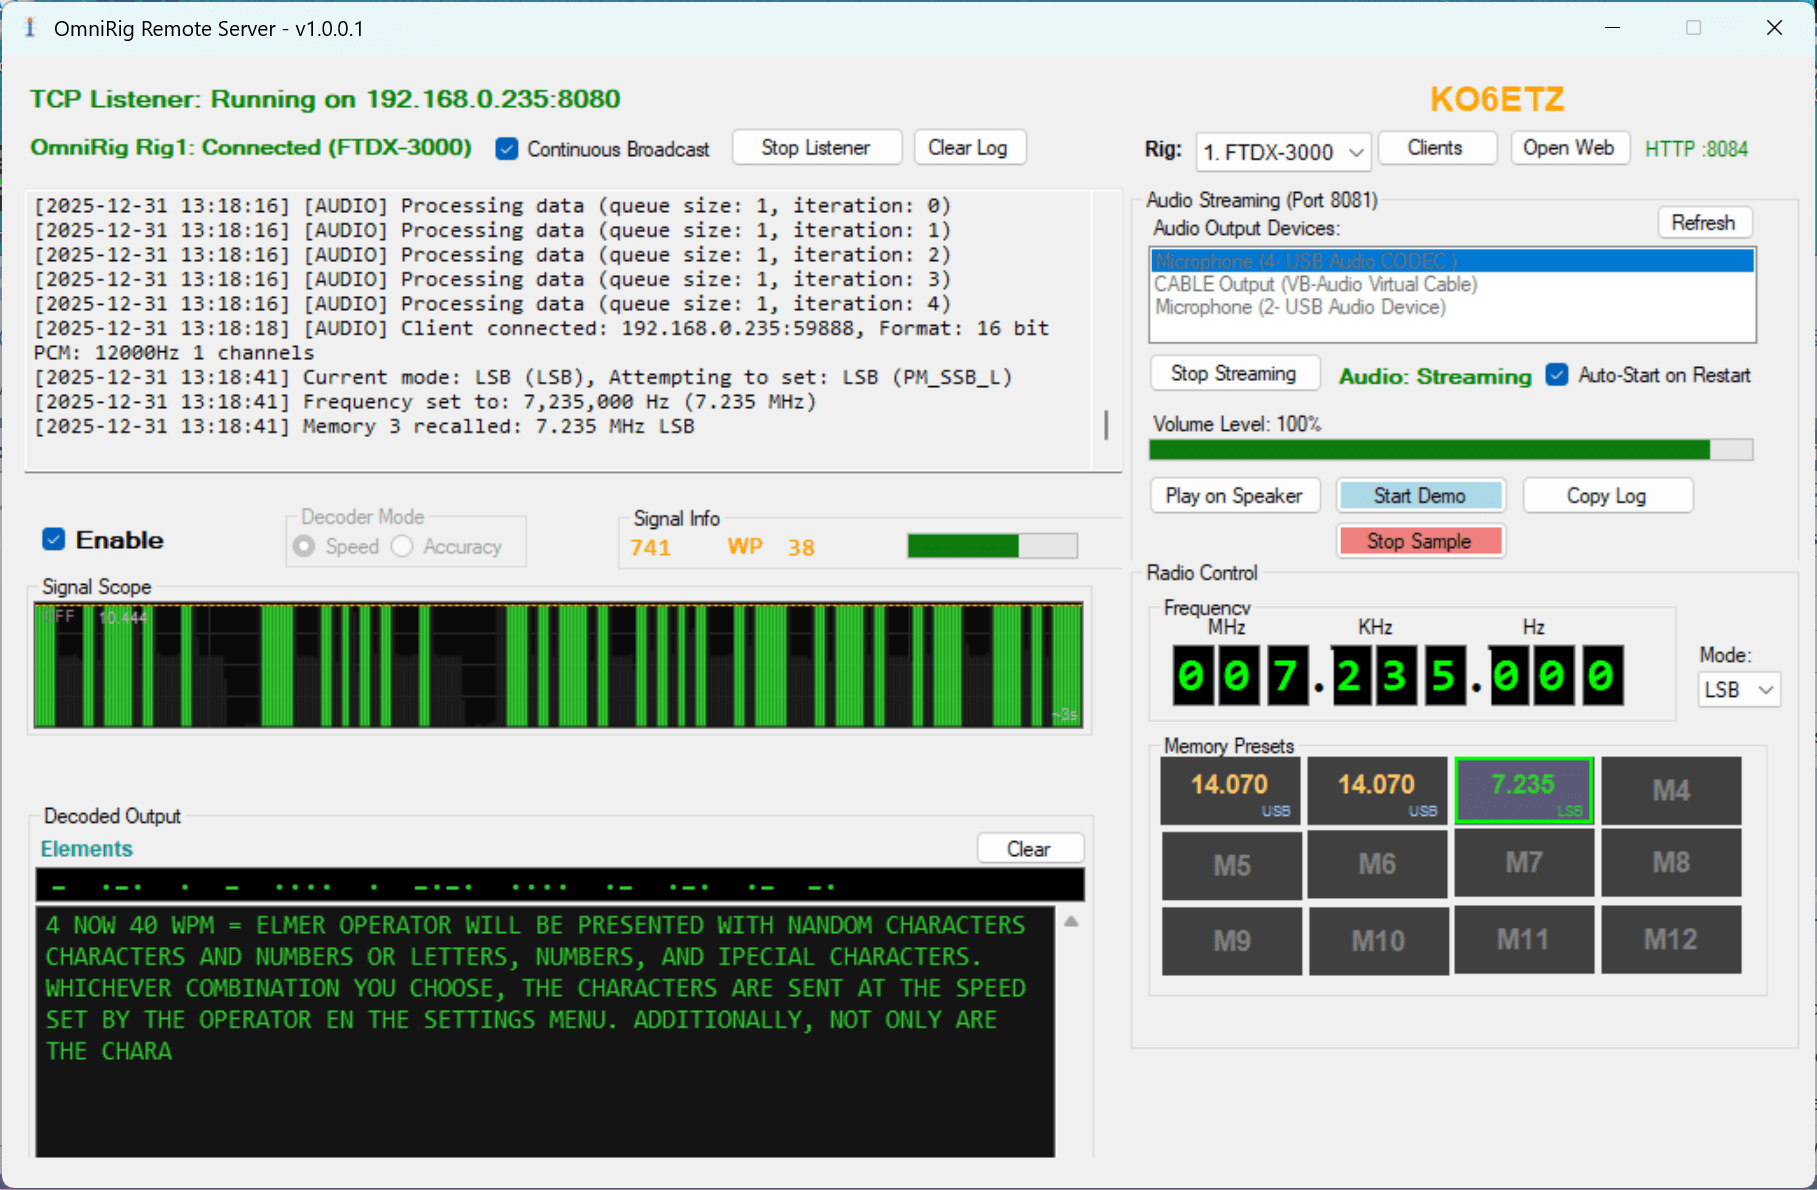
Server Application – Main window with frequency display, meters, and controls
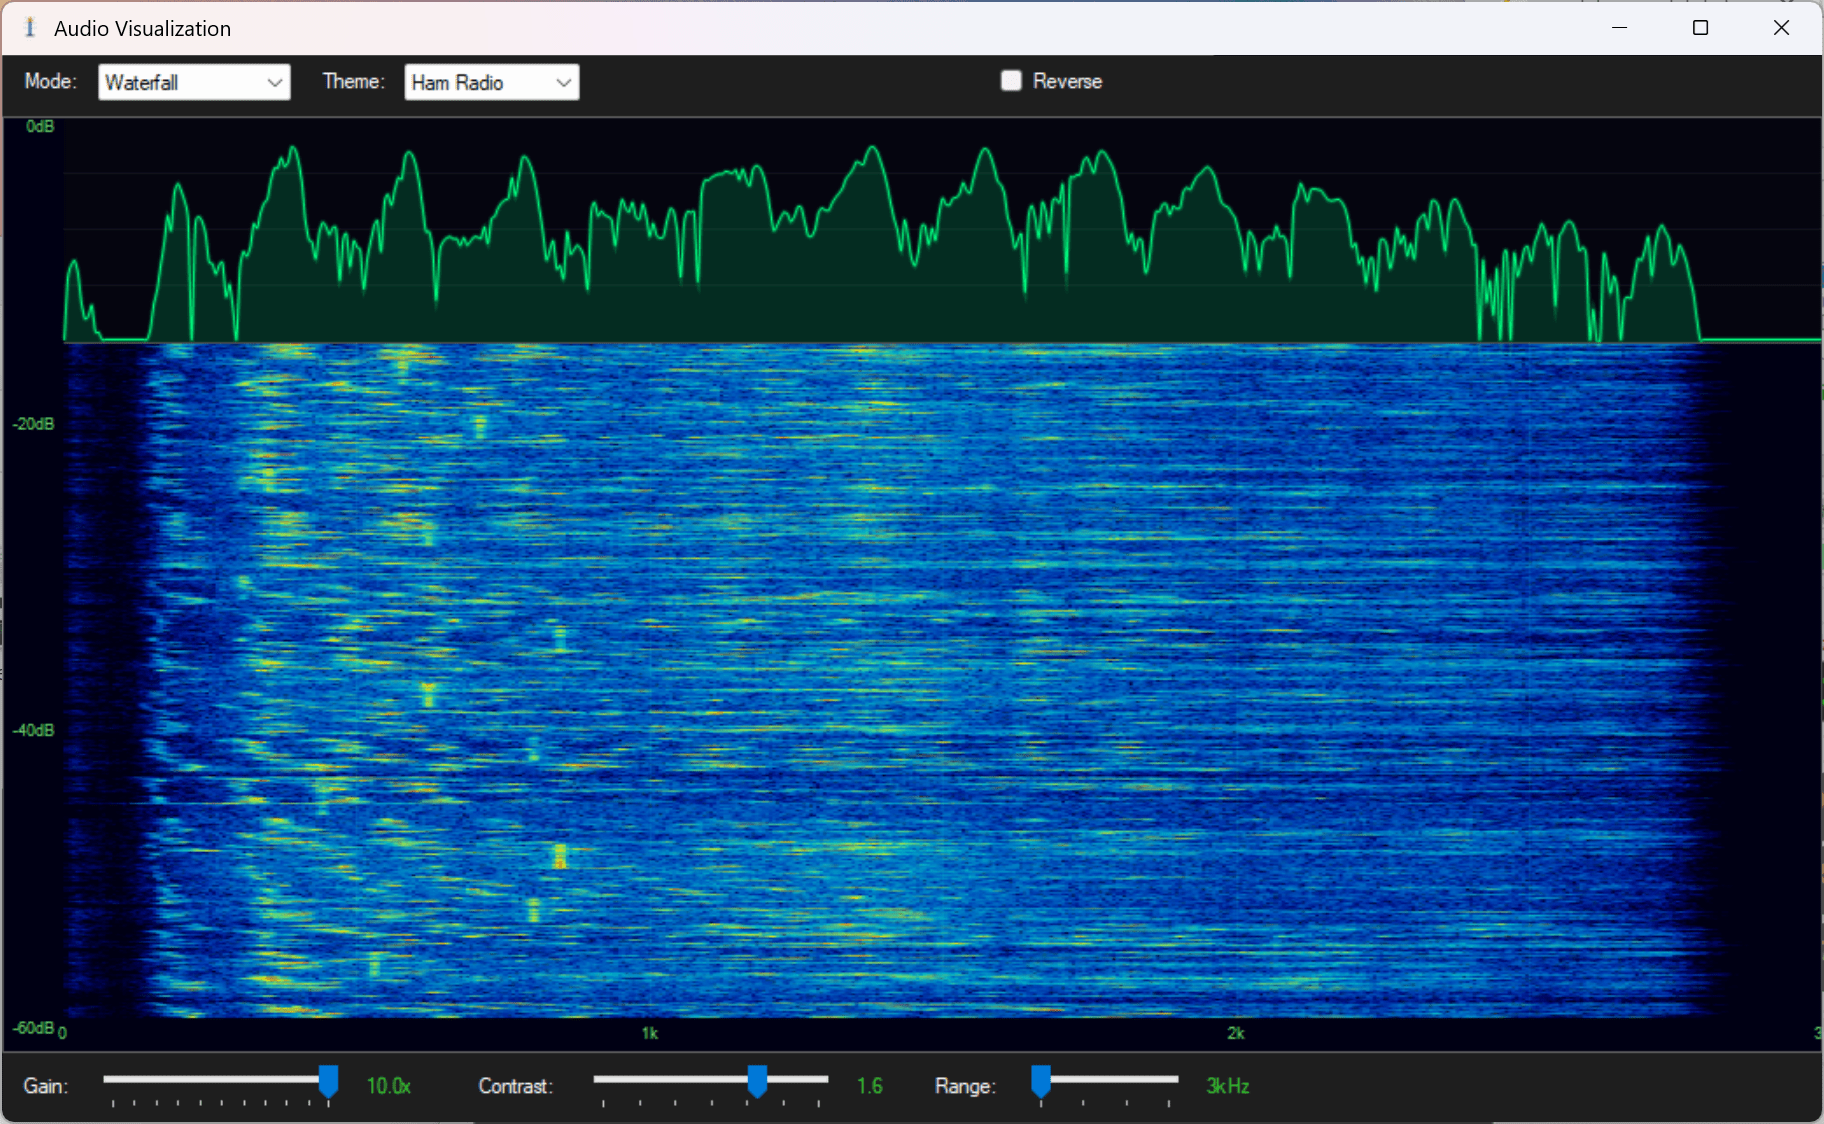
Waterfall Display – Real-time waterfall visualization with spectrum overlay and customizable themes
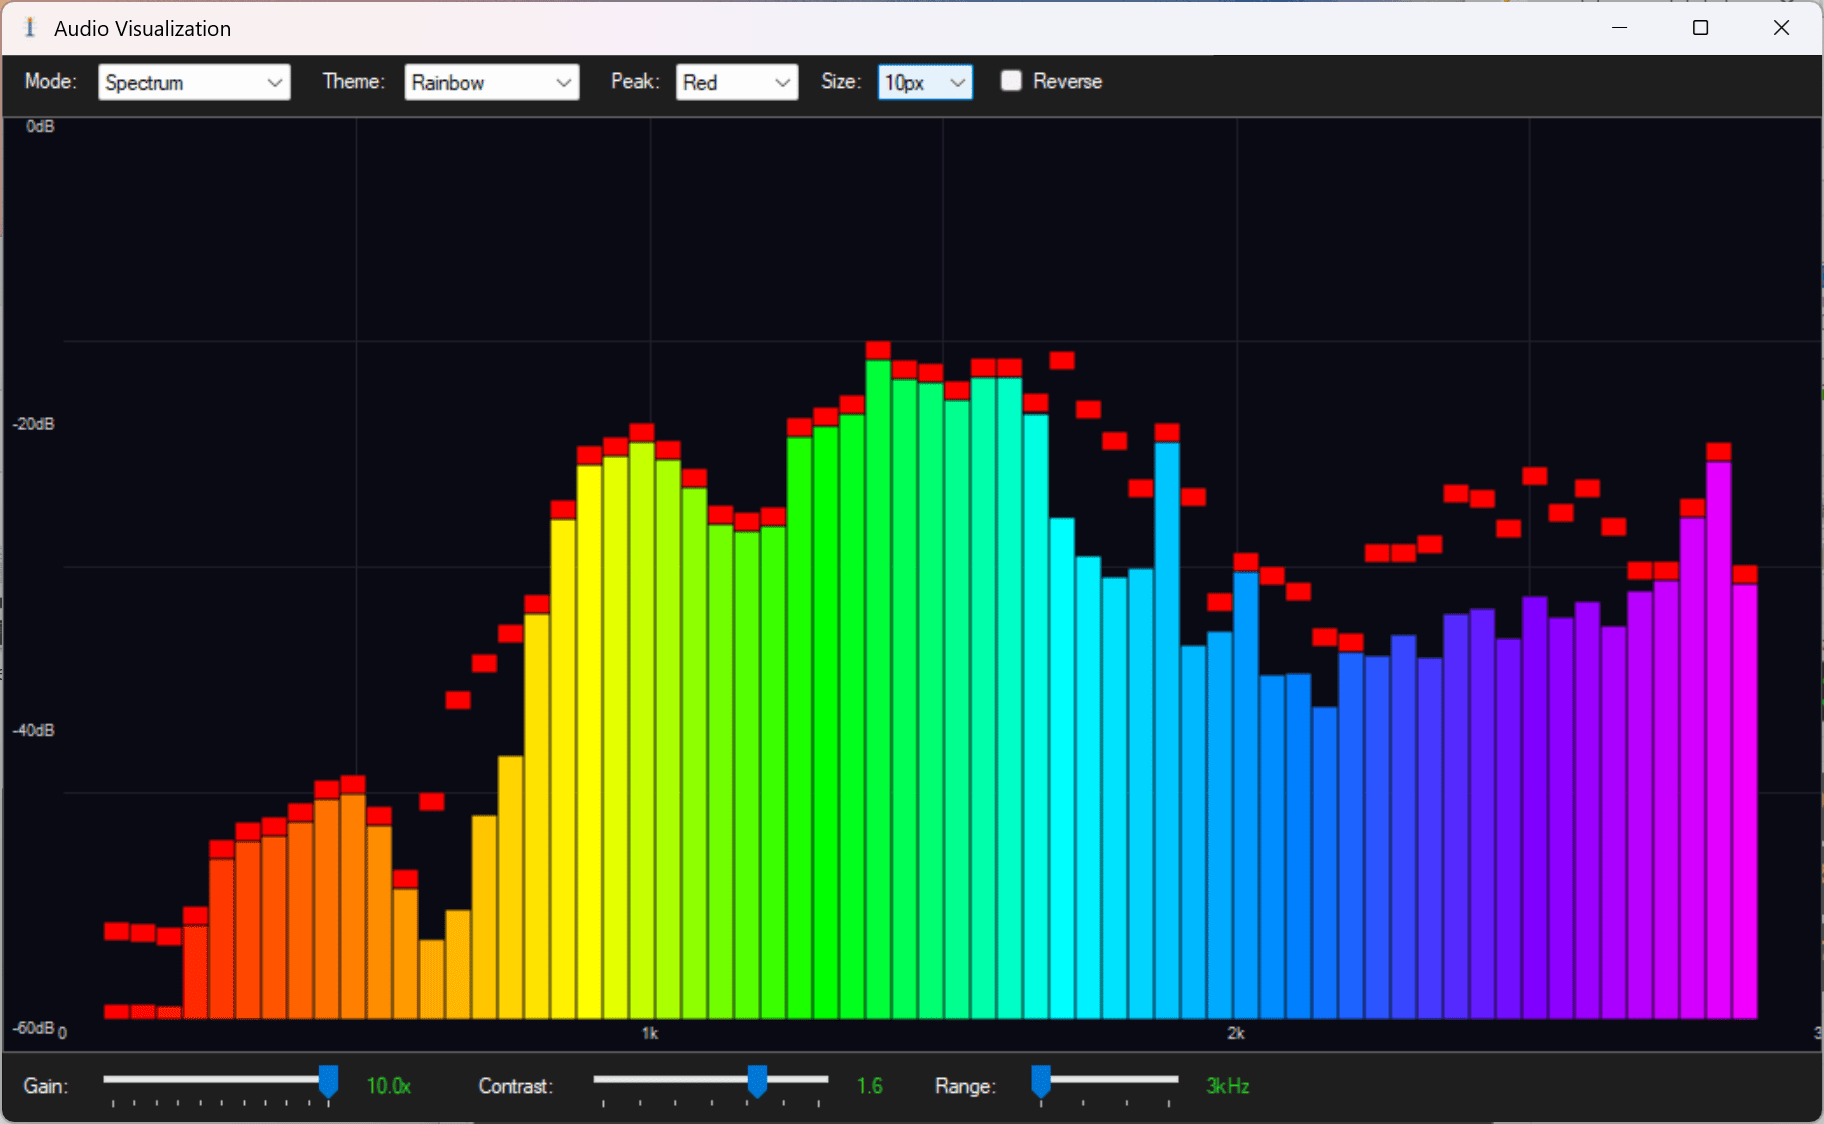
Spectrum Analyzer (Bars) – Classic bar-style spectrum display with peak hold indicators
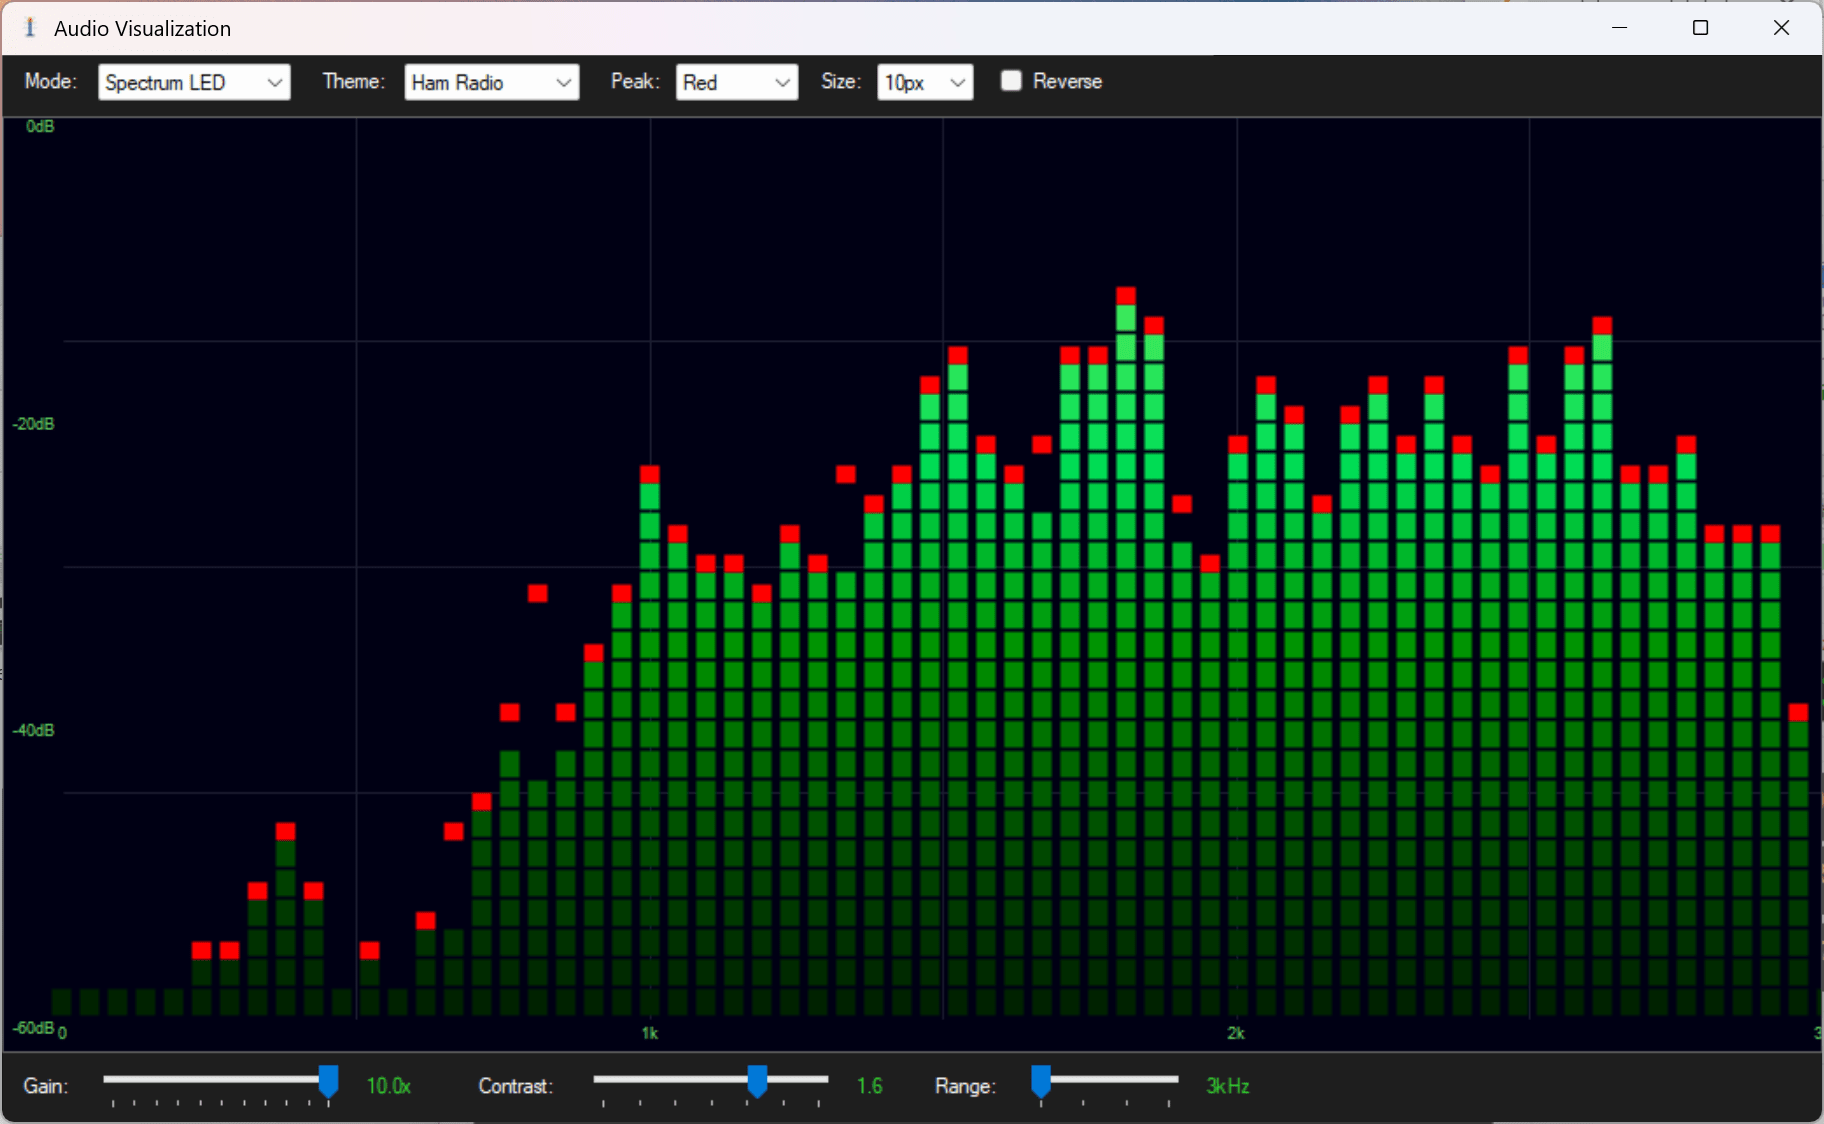
Spectrum Analyzer (LEDs) – Retro LED-style spectrum display with segmented bars and peak indicators
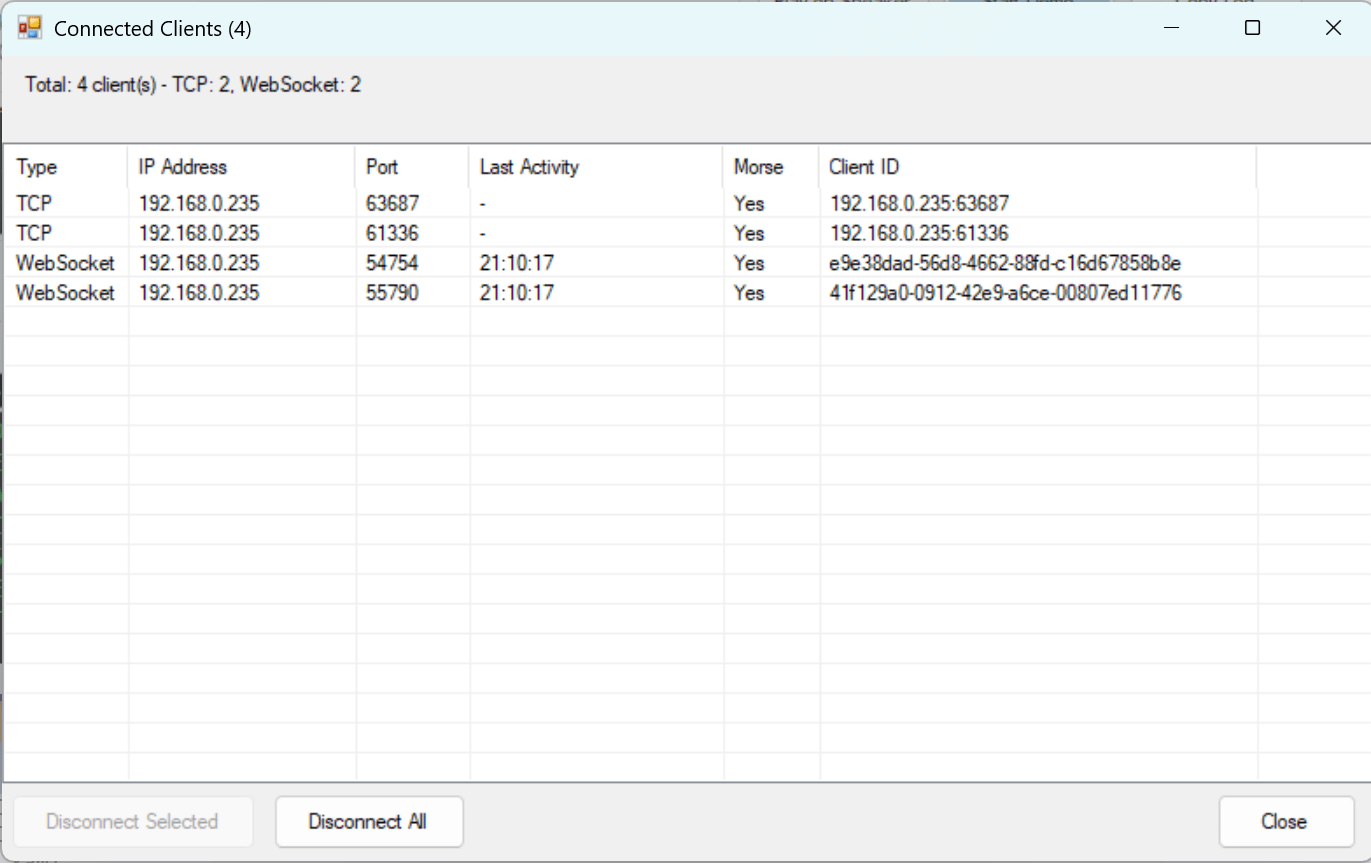
Client Management – Monitor and manage all connected WebSocket clients in real-time
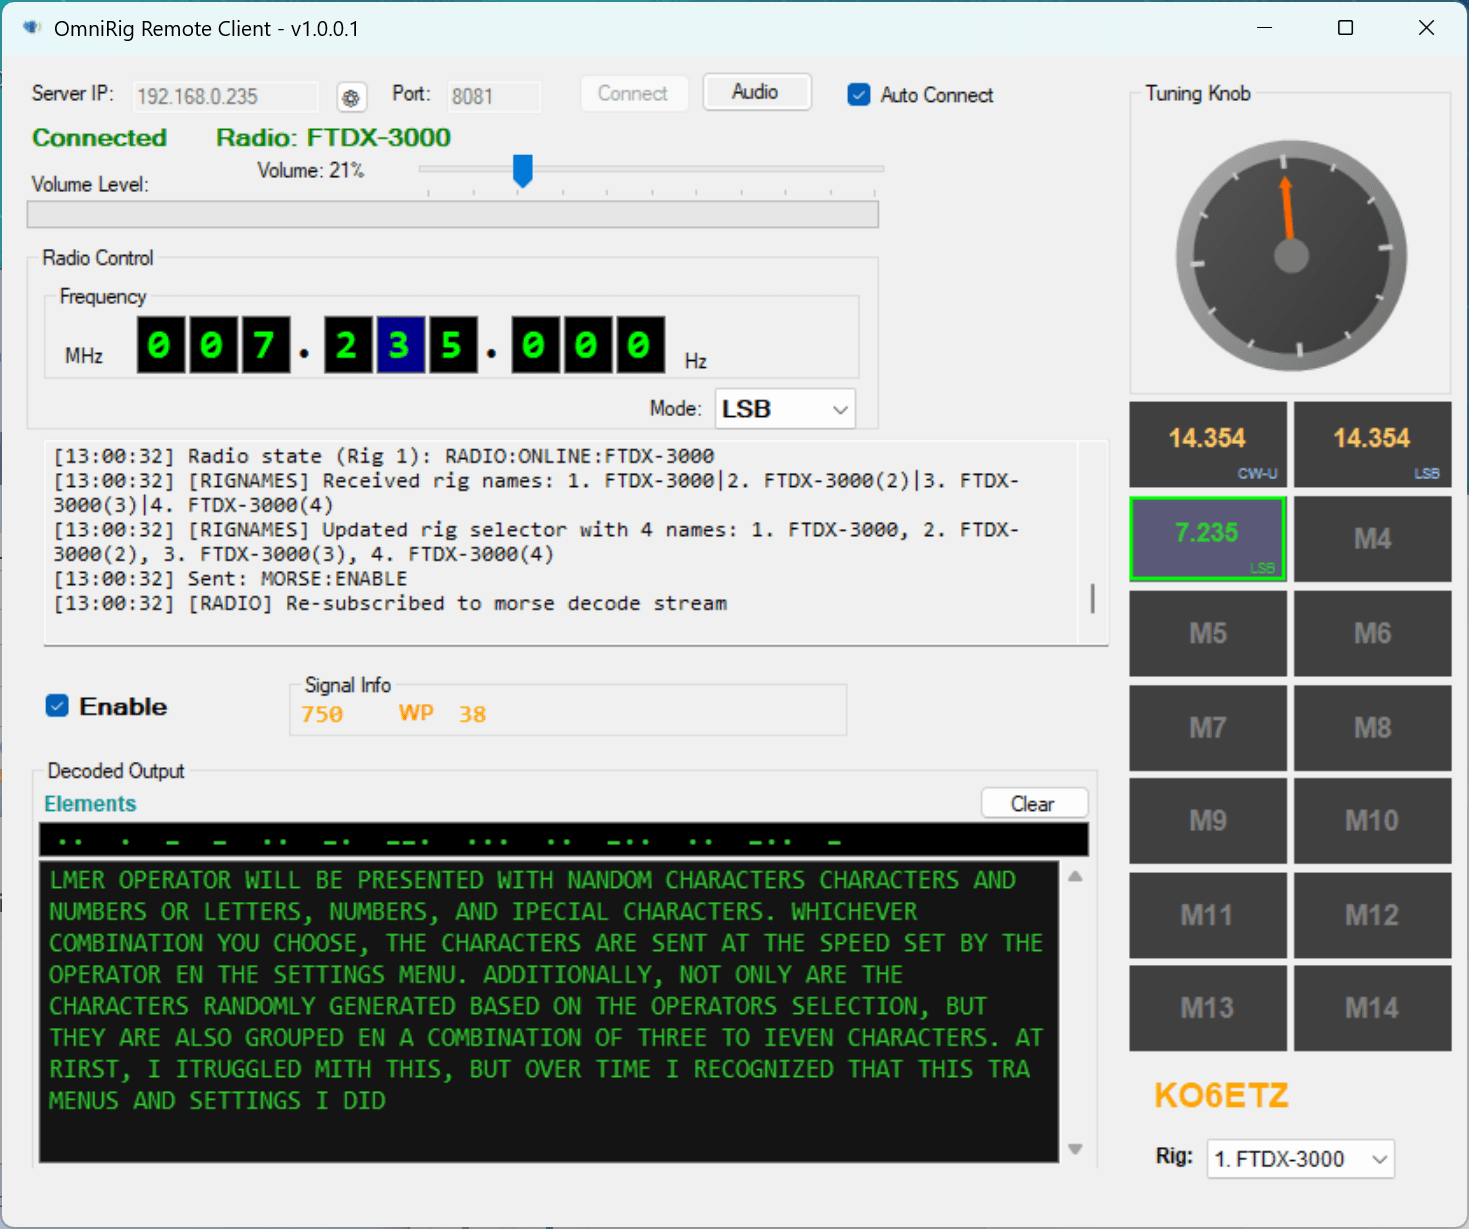
Desktop Client – Windows client with VFO display and tuning knob
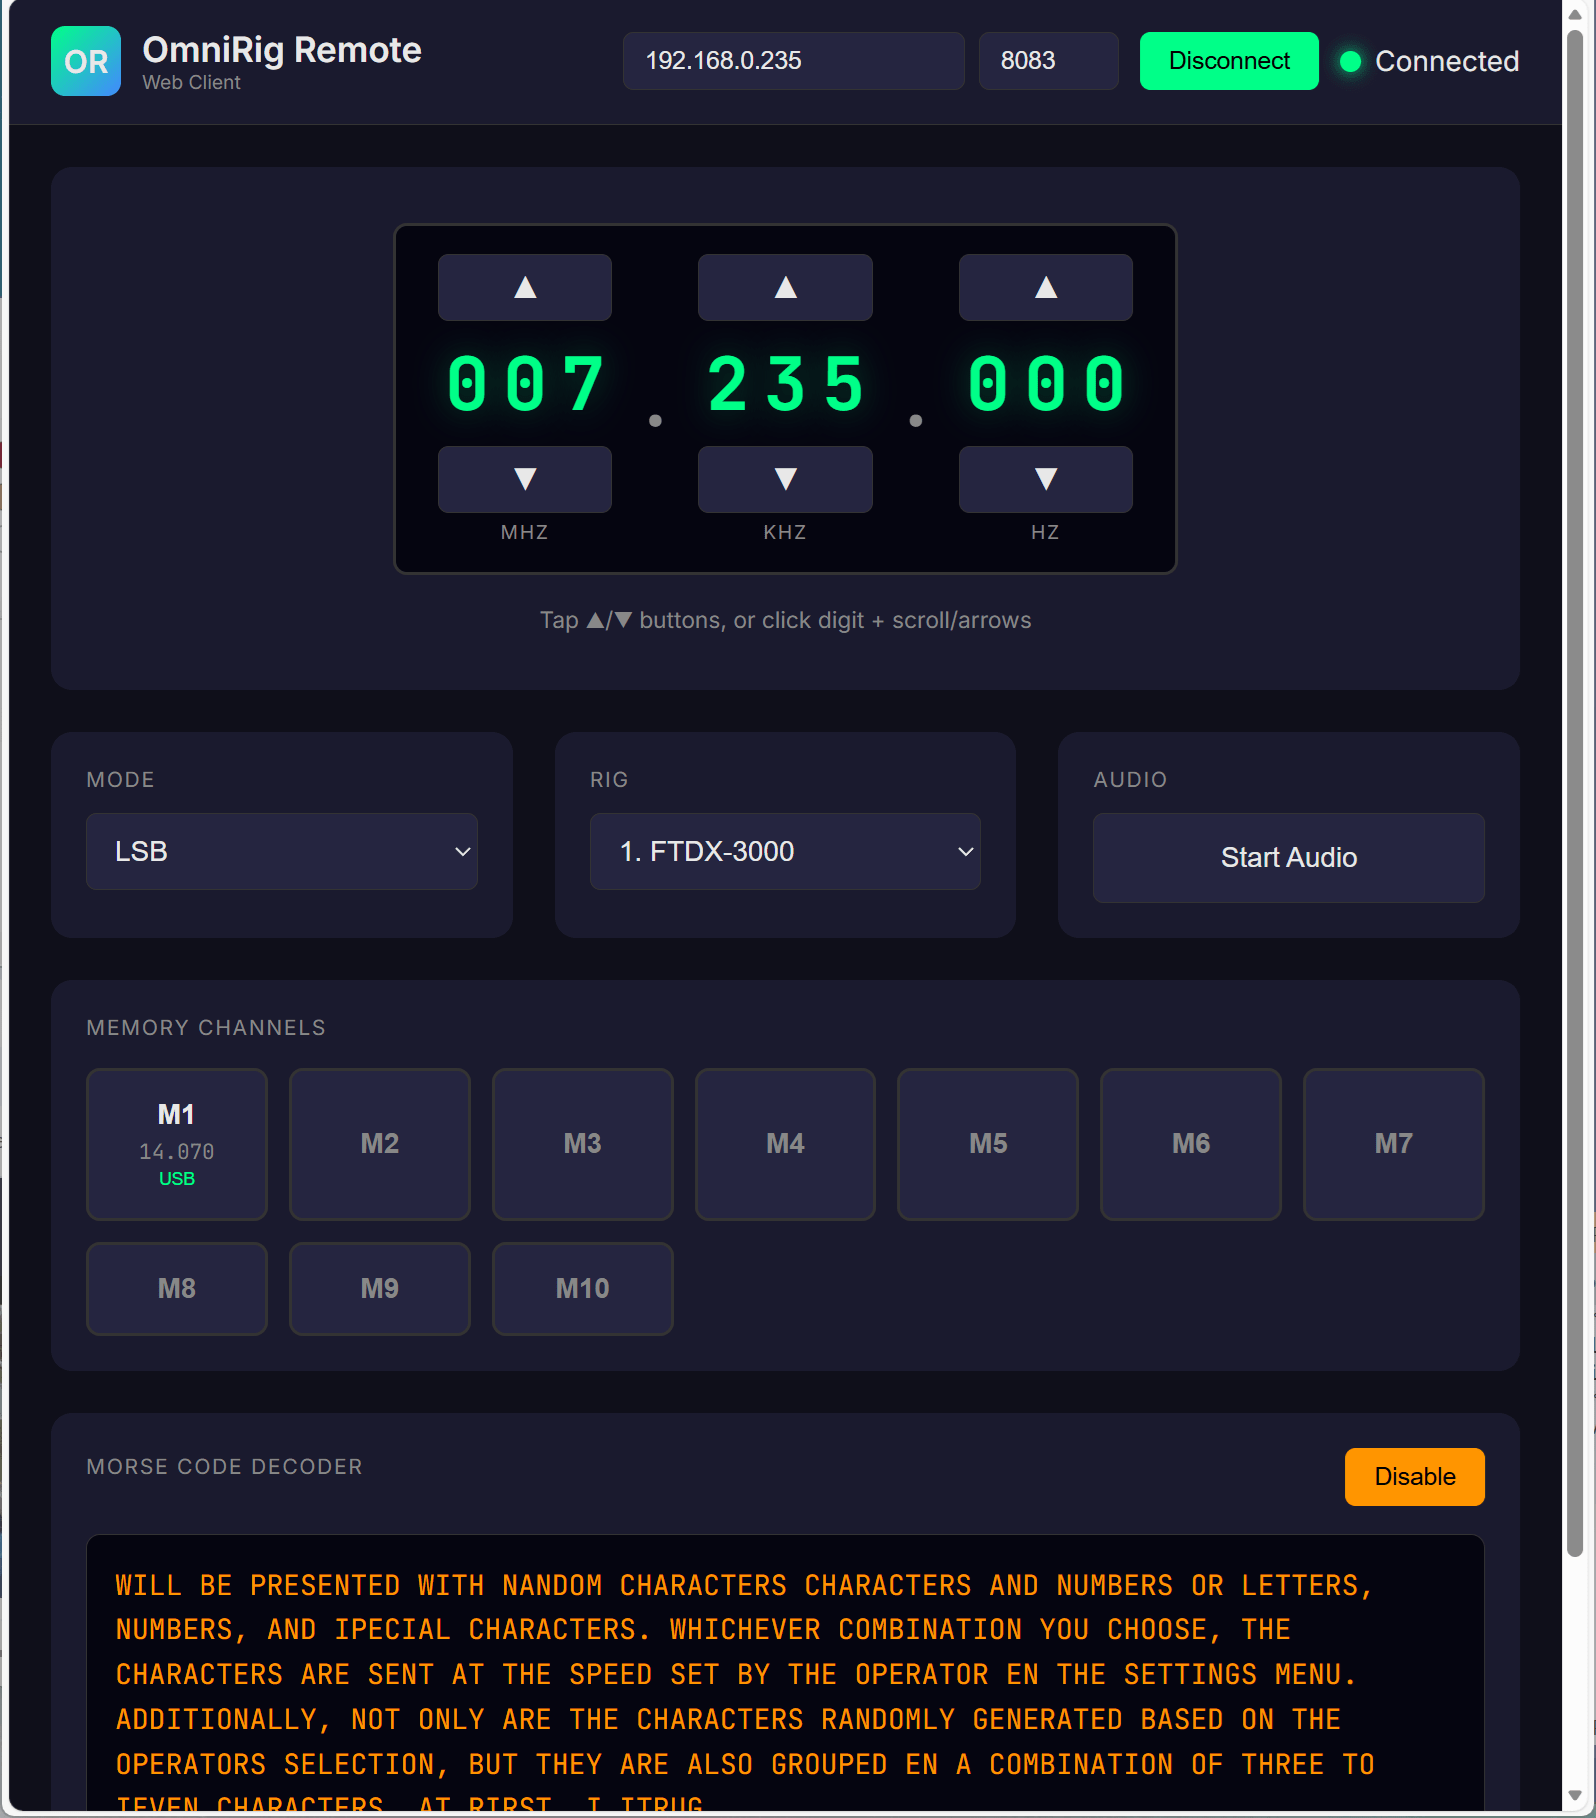
Web Client – Browser interface with frequency control and digital decoders

Home Assistant – Lovelace dashboard integration

Cross-Platform App – Windows, iOS, and Android with touch-friendly controls
👥 Client Management
Monitor and manage all connected clients from the server.
🌐 WebSocket Clients
View all connected web browsers and Home Assistant instances. See client IP addresses, connection time, and real-time status.
🕑 Auto-Refresh
Client list updates automatically every few seconds. New connections appear instantly, disconnected clients are removed.
🔒 Connection Control
Disconnect individual clients when needed. Useful for troubleshooting or managing server resources.
📊 Status Monitoring
Track audio streaming status and subscription state for each client. Identify which clients are actively receiving audio.
Accessing the Clients List
- Click the Show WS Clients button on the server main window
- A dialog opens showing all currently connected WebSocket clients
- The list auto-refreshes to show real-time connection status
- Select a client and click Disconnect to terminate its connection
WebSocket clients dialog showing connected browsers and their status
💡 Client Types
WebSocket clients include web browsers accessing the built-in web client, Home Assistant Lovelace cards, and any custom applications using the WebSocket API on port 8083.
🛠 Installation
Get up and running in minutes with these simple steps.
Step 1: Install OmniRig
Download OmniRig
Get the latest version from dxatlas.com/omnirig
Configure Radio
Set COM port, baud rate, and select your radio model
Test Connection
Verify frequency updates when tuning your radio
Step 2: Install OmniRig Remote Server
- Download the latest release from ditdots.com
- Extract all files to a folder (e.g.,
C:\OmniRigRemote) - Run
OmniRigRemoteServer.exe - When prompted by Windows Firewall, click Allow Access
📦 Required Files
Ensure all DLL files are in the same folder: NAudio.dll, NAudio.Core.dll, NAudio.Wasapi.dll, NAudio.WinMM.dll, NAudio.Lame.dll, Fleck.dll
Step 3: Configure Firewall
Allow incoming connections on these ports:
- 8080 – TCP radio control
- 8081 – TCP audio streaming and UDP auto-discovery
- 8083 – WebSocket for web clients
- 8084 – HTTP file server
Step 4: Connect Clients
Open a browser to http://[SERVER_IP]:8084 for web client, or install desktop/mobile client and enter server IP.
🎧 Audio Streaming
Setup
- Connect radio audio output to your sound card’s line input
- Select the audio input device from the dropdown
- Click Start Streaming to begin broadcasting
🎙 Audio Format
Audio is streamed as 12kHz, 16-bit, mono PCM. This provides good quality while minimizing bandwidth (24 KB/sec).
Demo Mode
Enable demo mode to generate synthetic Morse code audio for testing without a connected radio. Useful for development, demonstrations, and learning.
📊 Audio Visualization
Real-time audio visualization with multiple display modes and customizable themes.
Opening the Visualization Window
Click the Visualization button in the Audio Streaming section to open a modeless visualization window. The window stays open while you work with other controls.
Visualization Modes
🌊 Waterfall
Scrolling spectrogram display showing frequency over time. New data appears at top and scrolls down. Includes a smooth spectrum curve overlay. Great for identifying signals and monitoring band activity.
📈 Spectrum (Bars)
Classic bar-style spectrum analyzer with peak hold indicators. Shows real-time frequency amplitude across the audio passband. Peaks slowly decay to show recent maximum levels.
💡 Spectrum (LEDs)
Retro LED-style segmented display reminiscent of vintage audio equipment. 32 segments per bar with configurable peak indicators. Adjustable peak height from 1-10 pixels.
💨 Oscilloscope
Time-domain waveform display showing the raw audio signal. Useful for monitoring signal levels and identifying modulation patterns.
Color Themes
- Classic – Traditional green VU-meter style (green/yellow/red gradient)
- Neon – Vibrant cyan/magenta cyberpunk aesthetic
- Grayscale – Clean black and white display
- Ham Radio – Blue waterfall with green spectrum, optimized for radio use (default for Waterfall mode)
Display Settings
- Sensitivity – Adjust input gain for optimal display levels
- Contrast – Control the dynamic range of the visualization
- Freq Range – Set the maximum displayed frequency
- Peak Color – Choose peak indicator color (theme-based options)
- Peak Height – Set peak indicator height (1-10 pixels)
- Reverse – Flip waterfall scroll direction (new data at bottom)
💡 Settings Persistence
All visualization settings are automatically saved and restored between sessions. The window also remembers its position and size.
🔢 Digital Decoders
The server includes built-in decoders for CW (Morse) and RTTY digital modes. Select the decoder mode from the dropdown to switch between them.
Morse (CW) Decoder
- Select CW (Morse) from the decoder mode dropdown
- Enable the decoder checkbox
- Choose decoder algorithm: Speed Priority or Accuracy Priority
- Decoded text appears in the display and streams to clients
RTTY Decoder
- Select RTTY from the decoder mode dropdown
- Enable the decoder checkbox
- The decoder auto-detects baud rate (45.45 or 50 baud) and shift (170/425/850 Hz)
- Monitor signal quality and lock status indicators
- Decoded text appears in the display and streams to clients
💡 Why Server-Side Decoding?
Server-side decoding is more accurate than client-side because it processes the original audio without network jitter artifacts. CW works reliably at speeds up to 40+ WPM, and RTTY auto-detects standard amateur radio parameters.
Saving Decoded Text
Click the Save… button to save decoded text to a file. The default filename includes the decoder mode (cw/rtty) and timestamp.
📋 System Requirements
What you need to run OmniRig Remote Server and clients.
🖥 Server Computer
- ✓ Windows 7/8/10/11
- ✓ .NET Framework 4.7.2+
- ✓ OmniRig installed
- ✓ Sound card (for audio)
- ✓ Network connection
💻 Desktop Client
- ✓ Windows 7/8/10/11
- ✓ .NET Framework 4.7.2+
- ✓ Network to server
- ✓ Audio output device
🌐 Web Client
- ✓ Chrome 66+ / Firefox 76+
- ✓ Safari 14.1+ / Edge 79+
- ✓ Network to server
- ✓ Any OS supported
🏠 Home Assistant
- ✓ HA 2021.12 or newer
- ✓ Network to port 8083
- ✓ Lovelace dashboard
📱 Cross-Platform App
- ✓ Windows 10+, iOS 14+, Android 8+
- ✓ Network to port 8080
- ✓ WiFi recommended
📻 Radio Equipment
- ✓ OmniRig-supported radio
- ✓ CAT interface
- ✓ Audio cables (optional)
🔧 Troubleshooting
OmniRig Won’t Connect
- Check if OmniRig is running and configured properly
- Verify COM port settings match your radio
- Restart OmniRig and the server application
Clients Cannot Connect
- Verify the server is running and accessible
- Check firewall allows ports 8080, 8081, 8083, 8084
- Ensure client has correct server IP address
- Try pinging the server IP from the client machine
No Audio
- Select correct audio input device on server
- Check sound card levels in Windows Mixer
- Verify audio cables are connected
- Ensure audio streaming is started on server
- Check client volume is not muted
Digital Decoder Not Working
- Enable the decoder checkbox on server
- For CW: Adjust decoder mode (Speed/Accuracy) based on signal conditions
- For RTTY: Ensure the signal uses standard amateur radio parameters (45.45/50 baud, 170/425/850 Hz shift)
- Ensure audio streaming is active
- Check audio levels (too quiet or too loud affects decoding)
- Monitor the signal scope and quality indicators