💻 Desktop Client
Full-featured Windows application for radio control with audio streaming and tuning knob.
💡 Key Features
Audio Streaming
Real-time audio from your radio with adjustable volume
Frequency Control
9-digit display with mouse wheel tuning
Virtual Tuning Knob
Drag to tune with variable step sizes
Memory Buttons
14 slots – click to recall, long-press to save
Morse Decoder
Server-side CW decoding displayed in real-time
Multi-Rig Support
Switch between up to 4 configured radios
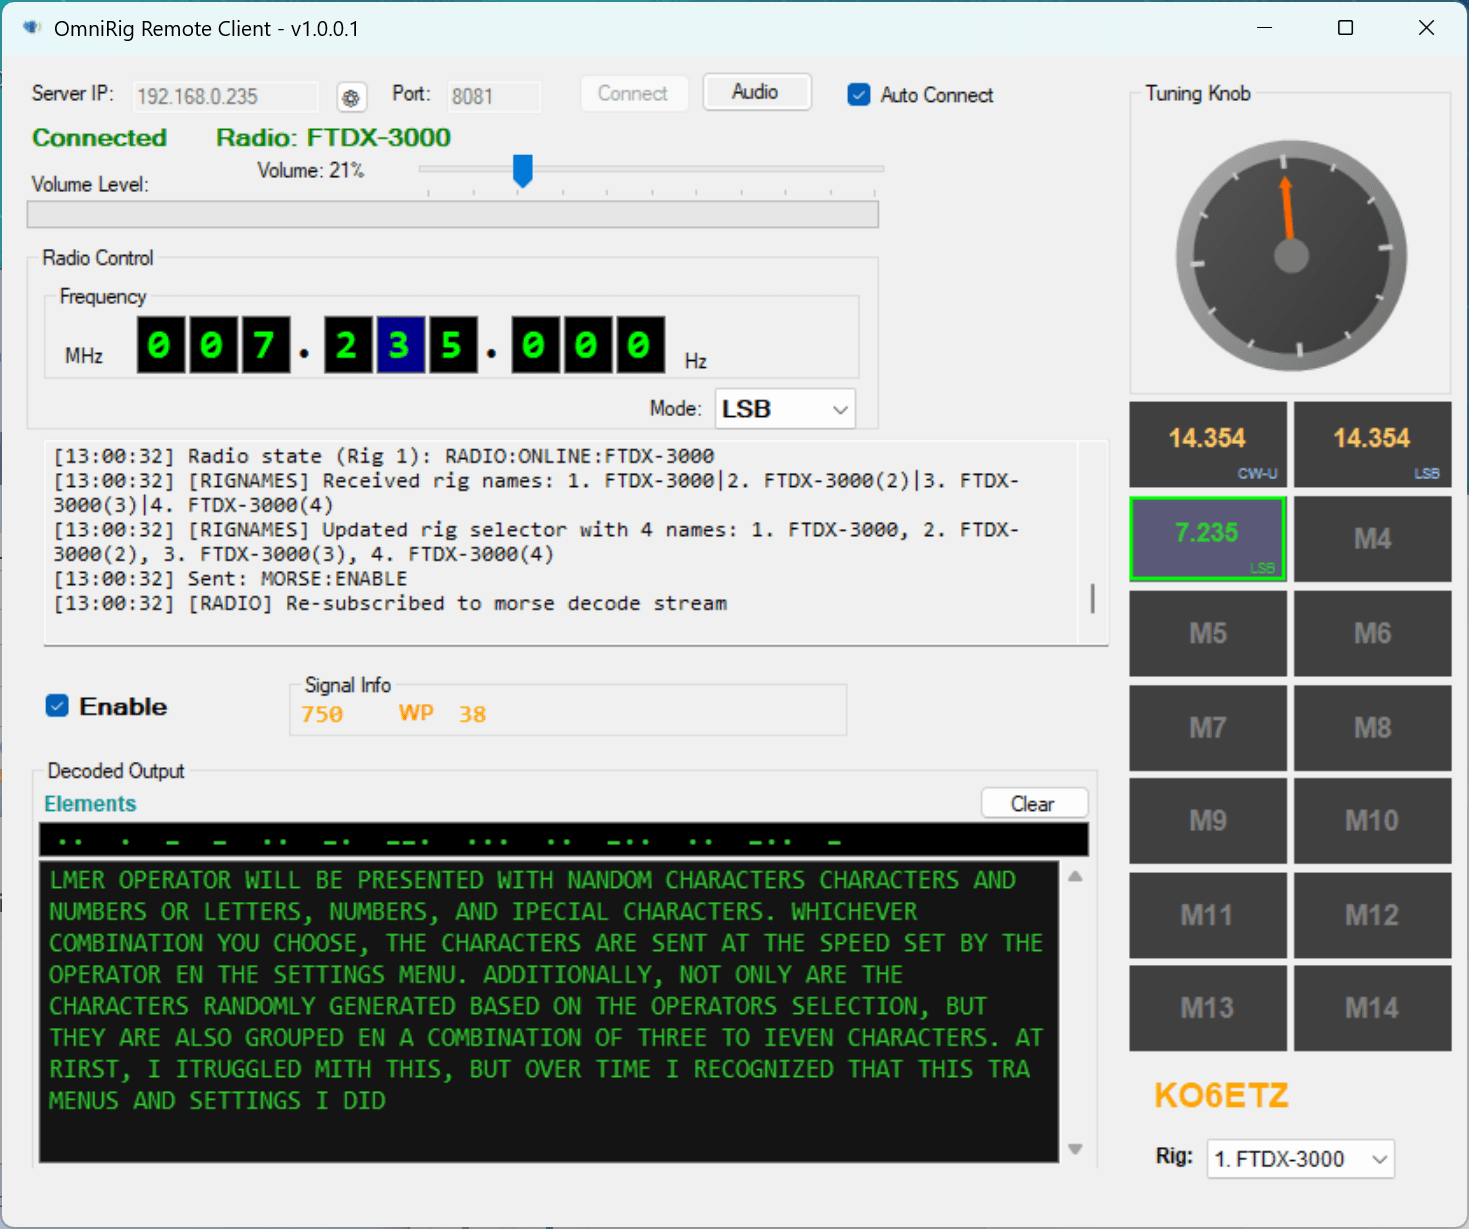
Desktop client main window showing frequency display, tuning knob, and memory buttons
📋 System Requirements
💻 Software
- ✓ Windows 7/8/10/11 (64-bit recommended)
- ✓ .NET Framework 4.7.2 or later
- ✓ Sound card with speakers/headphones
🌐 Network
- ✓ TCP port 8080 (radio control)
- ✓ TCP port 8081 (audio streaming)
- ✓ UDP port 8081 (auto-detection)
🛠 Installation
Download the Client
Download OmniRigRemoteClient.exe from the releases page at ditdots.com
Place in Desired Location
Copy the executable to a folder of your choice. No installation required – it’s portable.
Run the Application
Double-click OmniRigRemoteClient.exe. Windows may ask to allow network access – click Allow.
Configure Server Connection
Enter your server’s IP address and port, then click Connect. Enable Auto Connect to reconnect automatically.
🎮 User Interface
Connection Area
| Control | Description |
|---|---|
| Server IP | IP address or hostname of the OmniRig Remote Server |
| Port | Audio port (default: 8081). Control port is always 8080. |
| Config (gear icon) | Opens settings dialog for advanced options |
| Connect | Connect/disconnect from server. Shows current connection status. |
| Audio | Start/stop audio streaming (available when connected) |
| Auto Connect | Automatically connect when application starts |
Frequency Display
The frequency display shows the current frequency in a 9-digit LCD-style format:
- MHz digits (1-3) – Megahertz portion (e.g., 014 for 14 MHz)
- KHz digits (4-6) – Kilohertz portion (e.g., 070 for 70 KHz)
- Hz digits (7-9) – Hertz portion (e.g., 000 for 0 Hz)
Tuning Methods:
- Mouse wheel on digit – Hover over any digit and scroll to adjust
- Click to select – Click a digit to lock selection for knob tuning
- Selected digit – Shown with dark blue background
Virtual Tuning Knob
The tuning knob simulates a physical radio VFO knob:
- Click and drag – Rotate the knob to change frequency
- Clockwise – Increases frequency
- Counter-clockwise – Decreases frequency
- Step size – Determined by the selected digit in the frequency display
💾 Memory & Modes
Memory Buttons
14 programmable memory buttons for quick frequency recall:
- Quick click – Recall saved frequency and mode
- Long press (1 second) – Save current frequency and mode to that slot
- Empty slots – Show “M#” label only
- Programmed slots – Show frequency in MHz and mode
- Active memory – Highlighted when current frequency matches
Memory contents are stored on the server and synchronized with all connected clients.
Mode Selection
The mode dropdown allows selecting the operating mode:
- USB – Upper Sideband
- LSB – Lower Sideband
- CW – Continuous Wave (Morse)
- FM – Frequency Modulation
- AM – Amplitude Modulation
- RTTY – Radio Teletype
- DIG – Digital modes
Morse Decoder Panel
- Enable/Disable – Toggle Morse decoding subscription
- Decoded text – Shows characters as they are decoded
- Clear button – Clear the decoded text display
💡 Tip
Server-side decoding is more accurate than client-side because it processes the original audio without network jitter. Works reliably at speeds up to 40 WPM.
🔧 Configuration
Settings Dialog
Click the gear icon next to the Server IP to access settings:
| Setting | Description |
|---|---|
| Server IP | IP address of the OmniRig Remote Server |
| Force IP | Disable UDP auto-detection and always use specified IP |
| Callsign | Your amateur radio callsign (displayed in the application) |
Auto-Detection
By default, the client listens for UDP broadcasts from the server for automatic discovery:
- Server broadcasts its presence on port 8081
- Client automatically detects and connects when Auto Connect is enabled
- Use “Force IP” option if auto-detection doesn’t work (firewall blocking UDP)
⚠ Firewall Configuration
Ensure your firewall allows outbound connections on TCP ports 8080 and 8081. For auto-detection, also allow inbound UDP on port 8081, or use “Force IP” mode.
🔧 Troubleshooting
Cannot Connect to Server
- Verify the server is running and accessible
- Check the IP address and port are correct
- Ensure no firewall is blocking the connection
- Try pinging the server IP from command prompt
- If using auto-detection, try enabling “Force IP” mode
No Audio
- Ensure the Audio button shows “Stop Audio” (indicating streaming is active)
- Check system volume and ensure speakers are not muted
- Verify the volume slider in the client is not at zero
- Check that audio streaming is enabled on the server
Radio Shows Offline
- Verify OmniRig is running and connected to your radio
- Check the radio is powered on and communication cable is connected
- Restart OmniRig and reconnect from the server
Application Won’t Start
- Ensure .NET Framework 4.7.2 or later is installed
- Try running as Administrator
- Check Windows Event Viewer for error details